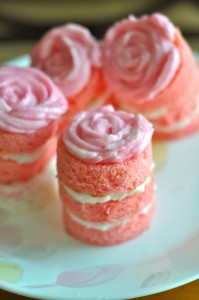
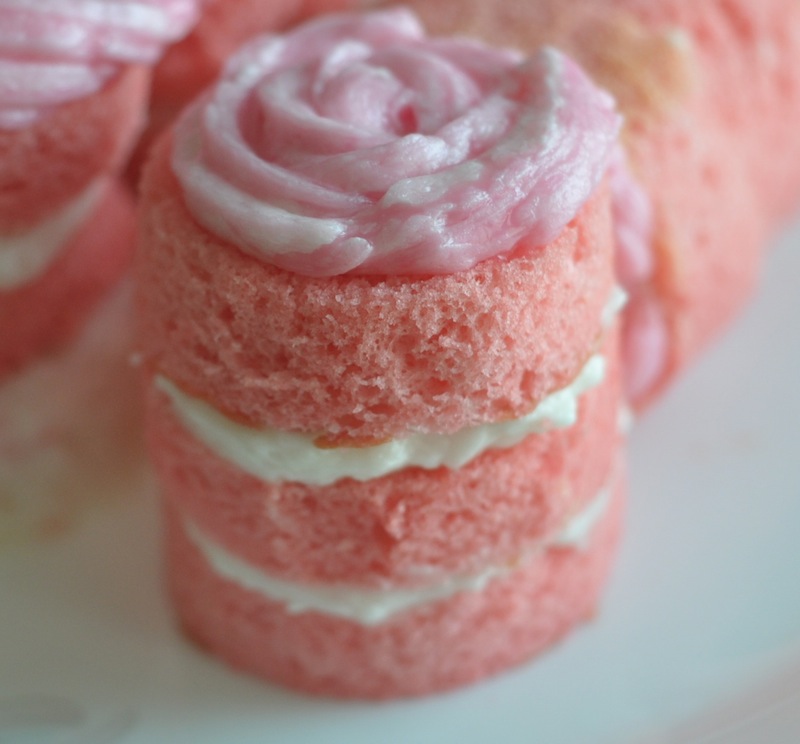
Make Mini Sponge Cakes with Simple Rosette Pipings. These are easy to make and nice for little girls parties!
Mini Rosette Cakes
® This is a RAS signature Recipe©
A detailed introduction, step-wise images and related links is available on the
Recipe Intro ↓ Check it out or scroll down for the recipe ⇓.

EAT AND TELL!!! Let us know if you tried – Mini Rosette Cakes
| ♦Mail me your pics and testimonials 🙂 – recipesaresimple@gmail.com ♦If you make the dish and share it on your social media please don‘t forget to tag me @recipesaresimple and hashtag it #recipesaresimple on any platform. ♥Please rate the recipe if you have tried it below ↓♦Quick Browse to see All Recipes by Category.♦World Cuisines to browse recipes by Country ♥Thanks for visiting www.recipesaresimple.com |
Mini Rosette Cakes
Description
This recipe creates a light and airy sponge cake, made with a classic method of separating egg yolks and whites. The cake layers are then cut into mini cakes, stacked with a smooth, stabilized whipped cream filling, and topped with a creamy decorator's icing, perfect for creating easy rosette designs.
Ingredients:
For the cake:
For the decorator icing: this makes a lot of icing. You can refrigerate the rest or halve the recipe.
For the Whipped cream:
Instructions
Prep for Cake:
-
Take out the eggs, separate white and yolks. Make sure theres no trace of yellow in the white. cover→set aside and allow to come down to room temperature.
-
Put the sugar for the cake in a food processor and process for 30 seconds – 1 minute to create a fine granulated sugar.- a must for our light as air cake.→set aside..
-
Sieve the Cake flour and salt together repeatedly for 3 times. First sieve into a wide bowl. Then drop onto waxed lunch paper or parchment paper and use this paper to easily drop the flour back into the sieve easily. and repeat this process twice→set aside.
-
Mix the oil, juice+ water solution and vanilla in a cup and set aside,allowing to bring to room temperature→set aside.
Make Frosting:
-
Measure the icing sugar,warm water, vanilla extract and salt into a bowl.
-
Allow to sit for a couple of minutes then stir slowly will the sugar is moistened.
-
In a mixer with a paddle attachment or using a ‘plastic blade’ , mix on low speed with only a quarter of the shortening.
-
Once well mixed and smooth scrape down the sides of the bowl and add the remaining shortening. Whip on high till thick and creamy.
-
I divided the frosting into 2 and mixed 2 drops red food color into one portion.
Continue with Cake:
-
Preheat the oven now to 350°F 180ºc
-
In Processor with whisk attachment , beat the egg yolks with the fine granulated sugar that we had set aside. Beat until a very Pale Yellow and creates ribbon like streaks when lifted.→set aside
-
In Another large Bowl using a hand mixer with wire whisk attachment,(Make sure there is absolutely no residue from the previous cooking on the bowl or whisk.It should be sterile and dry for best results.) Beat the Egg Whites till foamy.Add the creme of tartar.Continue beating till soft peaks form.At this point its better to continue beating by hand till stiff peaks occur(Do not over beat)
-
Give the oil/Juice mixture that we set aside a stir. Add this to the Yolk Mixture along with the food color. Stir to incorporate.
-
Now add the flour that we had sieved thrice into this yolk/oil mixture a little at a time till all the flour is evenly incorporated.
-
Lastly add the whipped egg white and fold into the flour batter.This should be done with a plastic spatula or whisk,folding in the egg white quite quickly without over mixing(IMPORTANT)also make sure there is no thick yolk mixture at the bottom of the bowl..Fold in gently but quickly till all the egg white is used.(A little bit of white lines is okay but no thick bits of yellow!)Divide & Pour into 2 cake pans equally(eyeball it).Pat gently on counter top move from side to side and pat again to remove air bubbles.Bake 30-35 minutes or till centre is set. Remove from oven and INVERT onto wire elevated Wire racks.(this will prevent the cake from sinking and cool off from the bottom; a good way to elevate is to place the wire racks atop kitchen colanders or baskets.)
-
Sprinkle the gelatin over cold water.
-
Let the gelatin stand for a minute or so until the gelatin is absorbed by the water.
-
Heat/Microwave the gelatin for about 30 seconds on high heat. The gelatin will be clear and melted. Now you can use it to stabilize your whipped cream.
Whipped Cream:
-
Start with ice chilled whip cream, chill your bowl as well as beater to at least ½ hr in freezer for easier results.
-
To the chilled bowl, add the cream and proceed to whip until it gets thick and starts to form soft peaks. Start on a lower speed and make your way to high speed if you don’t want splatter!
-
Gradually add in your confectioners sugar.
-
Add in your gelatin.
-
Add vanilla extract and whip till it holds stiff peaks.
-
DO NOT over-whisk from this point or you will make butter.
To Assemble:
-
Once the cakes are cooled completely use a sharp knife to go around the edge of the pans to release the cake onto flat plates. Slice each cake into two using a broad serrated knife. (I find the plastic serrated cake knife you get along with birthday cakes works well for this purpose)
-
Use a large cookie cutter to cut the cakes into as many rounds as possible.
-
Spread a layer of whipped cream on 2 slices of cake. Sandwich to make a 3-tier mini cake. Top layer with no whipped cream.
-
On the top, use a piping bag to create a rose design.
-
Continue the process with the remaining cakes.
Note
- This whipped cream is stabilized so it will last longer than ordinary whipped cream which melts quite quickly. Still, we don’t recomend making the whipped cream before the cake is ready.
- A pink Ombre cake can be made the same way by dividing cake batter with 2 or 3 shades of pink and baking in 2 or three pans as well.
- When whisking egg whites it is absolutely essential that your bowl and wire whisk are free from any residue. I like to wash these utensils with vinegar and warm water and scrub clean with soap after every use.
- Please use aluminum pans and not non stick.(ungreased!)
- Do not leave the cake in the oven to cool.When done immediately invert on wired racks to cool.
- Its a good idea to set around 3 large bowls one of which should be very large.
- 3 medium bowls, 2 small bowls, measuring cups, spoons and all the ingredients and processor/mixer/whisks before you start anything or your kitchen can get chaotic!